Swissphone DE506 - Operating Instructions
Contents
- 1. Putting your pager into Operation
- 2. Overview
- 3. Standby mode
- 4. Message Icons Display
- 5. Status Symbols
- 6. Menu
- 7. Submenu
- 8. Interface / Periphery
1. Putting your pager into Operation
Power Supply
| Energy Source: | Type: | Operation Time: |
|---|---|---|
| Alkaline Battery | LR 6, 1.5V | approx. 1500 hours |
| Nickel Cadmium Battery (rechargeable) | 600 mAh, AA, 1.2V | approx. 370 hours |
| Nickel Metal Hydrid Battery (rechargeable) | 110 mAh, AA, 1.2V | approx. 680 hours |
Inserting the battery
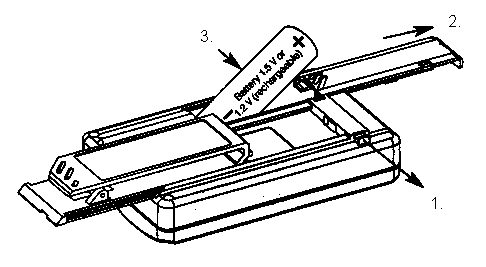
- Pull the securing pin (1) upwards.
- Remove the battery cover (2) by sliding it in the direction of the arrow.
- Insert the battery (3) and ensure correct polarity (+/-).
- The pager switches on automatically (display, vibrator).
- Replace the cover (2).
- Push the securing pin (1) downwards gently.
- Set the clock (see section 6.6).
All operation functions can be carried out with the three keys:
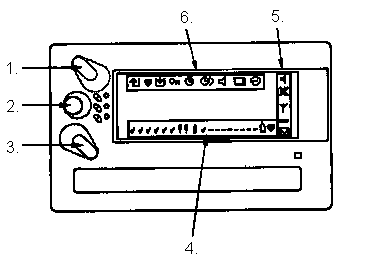
- Upper key
- Middle key
- Lower key
- Message icons (see section 4) Select with lower key (3)
- Status symbols (see section 5)
- Menu icons (see section 6) Select with upper key (1)
If the keys are not used within 16 sec., the pager automatically turns back to standby mode.
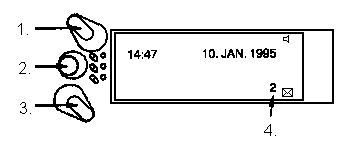
- Menu
- Enter
- Memory
- Number of unread messages
- Starting position: Standby mode
- Press any of the three keys.
- The display shows the first three lines of the last selected message:
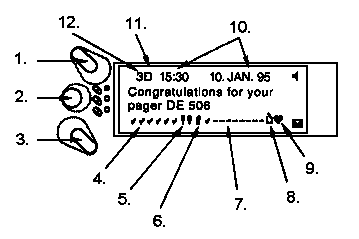
- Return to Menu
- Read Message
- Select message
- Read messages
- Unread messages
- Protected message
- Vacant memory sector
- Automatic Message File (see section 4.3)
- Personal message File (see section 4.4)
- Time and Date of received message
- Sub-address
- Main address
4.1 Selecting a Message
- Use lower key (3) to select message.
- The first three lines of the message will be displayed.
- To change the direction of cursor, press and hold key.
4.2 Reading Messages
- Press middle key (2) to read the selected message.
- Use the upper (1) and lower (3) key to scroll up and down within the message.
- Press the middle key (2) to exit.
- The unread message icon (see section 5) is replaced by the read message icon once a message has been read completely.
4.2.1 Display illumination
-
To illuminate the display for 16 sec., press and hold middle key (2) for 2 sec.
4.2.2 Extending Display Time
- The pager normally switches to standby mode, when no keys are pressed for more that 16 sec. This display time can be extended to 4 minutes for reading a message.
- Select message as described in section 4.1.
- Press and hold middle key (2) for 3 sec.
- Use upper (1) and lower (3) keys for scrolling the message up and down respectively.
- Exit read message by pressing middle key (2). The display time extension is automatically cancelled.
4.3 Symbol  : Automatix Message file
- Basic function: When all 18 message memories are full, the oldest message wil automatically be shifted into the Automatic Message File which will have a maximum memory of 6000 characters. To delete the entire file content see section 6.
- Mode: Message icon display or standby mode.
- Press the lower key (3) repeatedly, until the cursor reaches the icon "Automatic Message File".
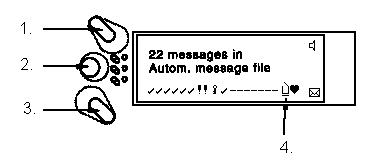
- Back
- Read message
- Read memory
- Automatix Message File (underlined)
- Confirm entry into automatic message file with middle key (2).
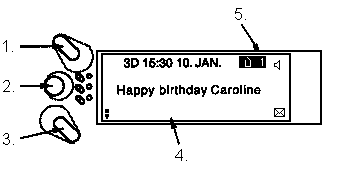
- Back
- Read message
- Lower/higher File No.
- Message in the Autoimatic Message file
- Message No. 1 in the Automatic Message file
The first three lines of all messages will be automatically scrolled on the display one after the other, except:
- Press upper key (1) to leave the automatic message file.
- Press middle key (2) to read the entire message currently displayed.
- Use upper (1) and lower (3) keys for scrolling up and down the message.
- Exit message by pressing middle key (2).
- Press the lower key (3) to jump to the next File No.
- Press and hold the lower key (3) to move in the opposite direction.
- To extend the message display time to 4 minutes, see section 4.2.2
4.4 Symbol  : Personal Message File
- Basic function: Personal file for storing selected messages with a maximum message capacity of 600 characters. To file the message see section 6.3 and to delete the entire file content see section 6.4.
- Mode: Standby mode.
- Press lower key (3) repeatedly until the cursor reaches "personal message file" icon.
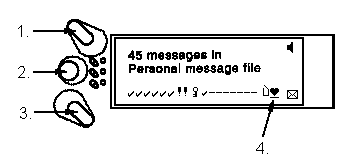
- Back
- Read message
- Read memory
- Personal message file (underlined)
- Confirm entry in to personal message file with middle key (2).
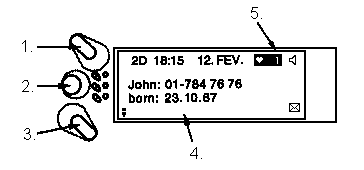
- Back
- Read message
- Lower/higher Personal file No.
- Personal message
- Personal message No.
The first three lines of all message will be automatically scrolled on the display one after the other, except:
- Press upper key (1) to leave the personal message file.
- Press middle key (2) to read the entire message currently displayed.
- Use upper (1) and lower (3) keys for scrolling up and down the message.
- Exit message by pressing middle key (2).
- Press the lower key (3) to jump to the next File No.
- Press and hold the lower key (3) to move in the opposite direction.
- To extend the message display time to 4 minutes, see section 4.2.1.
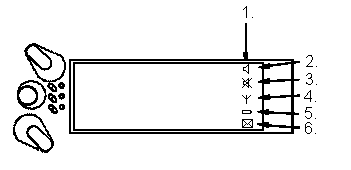
Illustrated status symbols have the following meaning:
- Status symbols
- Loud speaker (beep) switched on
- Loud speaker (beep) switched off
- Out of range
- Low Battery
- Unread messages
- Mode: Standby.
- Press upper key (1) twice and the following display appears:
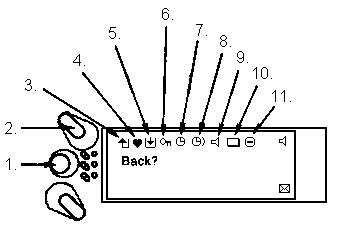
- Enter
- Select Menu
- Back? (flashing)
- File message?
- Delete message/ Automatic File / Personal File
- Protect Message?
- Set clock?
- Set alarm-clock?
- Loud? / Silent?
- Submenu?
- Turn off?
- The first icon "back?" will be blinking.
- Subsequent pressing of upper key (1) will cause the next menu icon to blink.
- Confirm the blinking menu function with middle key (2).
- When no key is pressed for 16 sec., the pager automatically goes to Standby mode.
6.1 Programming option: Simplified Operation
In simplified operation mode, all menu functions are switched off. The menu functions can however be temporary switched on by pressing the upper (1) and lower (3) keys simultatiously.
The pager will automatically switch back to simplified operation mode:
- when it is in standby mode
- when a new message is received.
 Display Text: "Back?"
- Press the upper key (1) repeatedly until the menu "Back" text appears (menu icon flashes).
- Press the middle key (2) to get back to message menu icon display.
6.3 Menu Symbol: Display Text: "File message?"
- Press the upper key (1) repeatedly until the menu "file message" text appears (menu icon flashes).
- Press the lower key (3) until the message to be files appears.
- Confirm it with the upper key (1).
- Display text "file message ?" appears.
- Confirm it with middle key (2).
- Display text "message filed" appears.
- Press upper key (1) to leave this menu function.
6.4 Menu Symbol:  Display Text: "Delete Message?"
- Press the upper key (1) repeatedly until the menu "Delete Message?" text appears (menu icon flashes).
- Press the lower key (3) until the message to be deleted appears.
- Confirm it with middle key (2).
- Display text: "Are you sure?" appears.
- Confirm it with middle key (2).
- Press upper key (1) to leave this menu function.
The above procedure also applies for deleting "Automatic Message File" or "Personal Message File".
6.5 Menu Symbol:  Display Text: "Protect Message?"
- Press the upper key (1) repeatedly until the menu "Protect Message?" text appears (menu icon flashes).
- Press the lower key (3) until the message to be protected appears.
- Confirm it with upper key (2).
- Display text: "Protect Message?" appears.
- Confirm it with middle key (2).
- Press upper key (1) to leave this menu function.
- The same procedure also applies for cancelling the message protection.
6.6 Menu Symbol:  Display Text: "Set Clock?"
- Press the upper key (1) repeatedly until the menu "Set clock?" text appears (menu icon flashes).
- Confirm it with middle key (2).
- Set "Hours" with the help of upper (1) or lower (3) key.
- Confirm it with middle key (2).
- Set "Minutes", "Year", "Month", "Day" similary.
- "Clock set" appears on the display at the end.
6.7 Menu Symbol:  Display Text: "Set alarm clock?"
- Press the upper key (1) repeatedly until the menu "Set alarm clock?" text appears (menu icon flashes).
- Confirm it with middle key (2).
- Set "Hours" with the help of upper (1) or lower (3) key.
- Confirm it with middle key (2).
- Set "Minutes" similary.
- "Alarm set" appears on the display at the end.
The alarm is activated every 24 hours at the time set. Following menu icon appears in standby mode. Remark:
-
The alarm will be activated, even when the pager is switched off (see section 6.11)
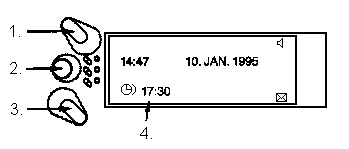
- Menu
- Enter
- Memory overview
- Alarm time
Switching off the alarm
- Press the upper key (1) until the menu "Set alarm" text appears (menu icon flashes).
- Press middle key (2) three times.
6.8 Menu Symbol:  Display Text: "Silent?"
- Press the upper key (1) repeatedly until the menu "Silent?" text appears (menu icon flashes).
- Confirm it with middle key (2).
- The status symbol "Silent" (
 ) appears.
- Now the message reception is indicated through the vibrator.
6.9 Menu Symbol: Display Text: "Loud?"
- Press the upper key (1) repeatedly until the menu "Load?" text appears (menu icon flashes).
- Confirm it with middle key (2).
- The programmed beep sounds at the time of message reception (see section 7.2).
6.10 Menu Symbol:  Display Text: "Submenu?"
- Press the upper key (1) repeatedly until the menu "Submenu" text appears (menu icon flashes).
- Confirm it with middle key (2).
- See section 7 Submenu for further details.
6.11 Menu Symbol:  Display Text: "Turn off?"
- Press the upper key (1) repeatedly until the menu "Turn off" text appears (menu icon flashes).
- Confirm it with middle key (2).
- Display text "Turn off?" appears.
- Confirm it with middle key (2).
- The pager is switched off. No messages can be received. All data received before and the working mode set previously remain intact. Clock and data also continue to run.
6.12 Switching on
- Press any of the keys for approx. 2 seconds.
- All menu icons are displayed for a short time together with beep and vibrator.
- The pager is now in operation and ready to receive the messages.
- Mode: Standby.
- Enter menu mode as describer in section 6.10.
- Press the upper key (1) repeatedly until the menu "Submenu" icon blinks.
The follwing display appears:
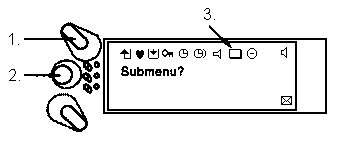
- Menu
- Enter
- Submenu (flashing)
- Confirm the Submenu function with middle key (2).
Overview of Submenu functions:
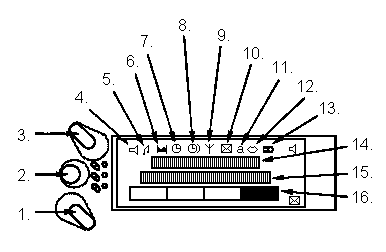
- Change setting
- Message icon display
- Select Submenu
- Set Volume
- Tone selection
- Sleep mode
- Clock system
- Snoozer
- Acoustic out of range alerting
- Acoustic call reminder
- Message Font
- Language
- Battery
- Submenu text
- Setting text / symbols
- Selected setting
- Press upper key (1) repeatedly until the desired Submenu icon blinks. The text and symbols corresponding to the Submenu are displayed in the space shown in the above illustration.
- Use lowe key (3) to select desired setting.
- Exit Submenu using middle key (2).
- Press upper key (1) to move to the next Submenu function.
- When no key is pressed for 16 seconds, the pager automatically turns to message icon display.
7.1 Volume
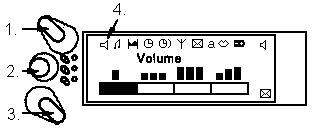
- Submenu
- Message overview
- Volume
- Symbol flashing
Four settings of volume are possible:
 |
short beep |
 |
low tone beep |
 |
loud tone beep |
 |
beep tone increasing from low to high |
The beep samples are described in section 7.2.
Programming option: Priority call
Priority calls are urgent and hence the alerting is done with loud beep.
7.2 Tone Selection
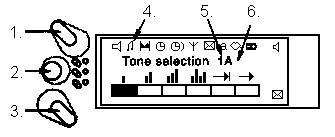
- Submenu
- Message icon display
- Tone selection
- Symbol blinking
- Main address
- Subaddress
- Tone selection allows the tone patterns to be selected for each subaddress.
- Confirm entry into tone selection function with lower key (3).
- Select tone with lower (3) key for first subaddress. Confirmation with a beep.
- Select the next subaddress by pressing upper (1) key.
- Repeat beep selection process as described above.
Overview of all tone patterns
| Beep pattern 1: standard | high tone |  |
| Beep pattern 2: firebrigade | very high tone high tone |
 |
| Beep pattern 3: Tritel | medium tone low tone very low tone |
 |
| Beep pattern 4: Ping-Pong | medium tone low tone very low tone |
 |
| Beep pattern 5: 12 sec. | medium tone | 12 seconds. |
| Beep pattern 6: Continuous | medium tone | until pressing key |
- It is always possible to switch to the next Submenu icon by pressing upper (1) key for 2 sec.
7.3 Sleep mode
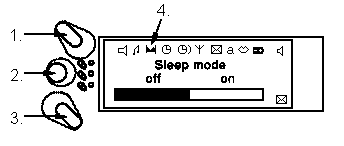
- Submenu
- Message icon display
- Sleep mode
- Symbol flashing
- "Off": No sleep mode.
- "On":
Following functions are switched off:- New messages are not indicated with beep or vibrate.
- Acoustic "Out of range" and "Acoustic call reminder" are switched off.
Following functions remain active:- "Alarm clock" and "Snoozer".
- The sleep mode is displayed on upper line in standby mode.
Programming option: Priority call
Priority calls are urgent and hence the alert cannot be suppressed.
7.4 Clock System
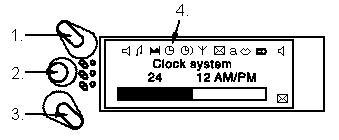
- Submenu
- Message icon display
- Clock system
- Symbol flashing
- "24": 24 hour clock mode is set.
- "12 AM/PM": The 12 hour clock mode is set.
In both cases the date is displayed as follows: day/month/year.
7.5 Snoozer
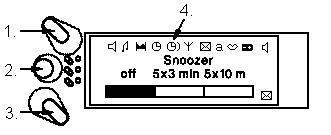
- Submenu
- Message icon display
- Clock system
- Symbol flashing
- "Snoozer" allows alarm clock alert to be repeated. Only active if alarm clock has been set.
- "Off" The snoozer function is switched off.
- "5 x 4 min": Alarm repeated every 3 minutes, max. 5 repetitions.
- "5 x 10 min": Alarm repeated every 10 minutes, max. 5 repetitions.
- Short press of middle key (2) interrupts snoozing for 3 or 10 minutes.
- Long press of any of the three keys switches off snoozing function for 24 hours.
7.6 Acoustic "Out of range" Warning
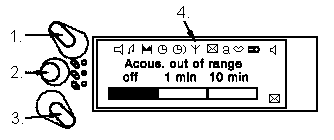
- Submenu
- Message icon display
- Acoustic "Out of range" warning
- Symbol flashing
- "Off": The out of range warning function is switched off.
- When the pager is out of reception range, a warning beep (high/low) is given after "1 min" or "10 min".
- A beep (low/high) occurs when the pager returns back to reception range.
7.7 Acoustic Call Reminder
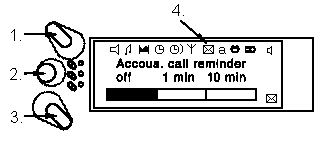
- Submenu
- Message icon display
- Accoustic call reminder
- Symbol flashing
- "Off": The acoustic call reminder is switched off.
- A warning beep is given every "1 min" or "10 min" if an incomming message has not been read completely.
7.8 Message-Font
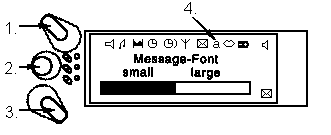
- Submenu
- Message icon display
- Message-Font
- Symbol flashing
- "Small": The message text is in small script.
- "Large": The message text is in large script.
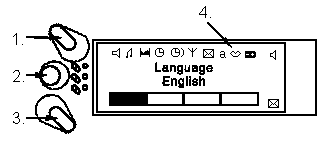
- Submenu
- Message icon display
- Language
- Symbol flashing
- Selection of language (German, English, Frensh, Spanish) for help text.
7.10 Battery
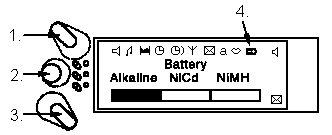
- Submenu
- Message icon display
- Battery
- Symbol flashing
- Selection of battery type used (Alkaline Battery, Nickel Cadmium or Nickel Metal Hydride Accu).
8.1 Accessoires
Following units can be used for the DE506 pager:
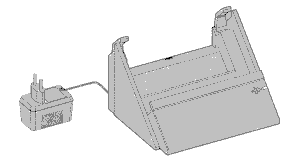
| LG 505/510 | Simple charging device |
| LGA 505/510 | Charging device with an antenna connection. |
| LGR 505 | Charging device with an external message signalling (e.g. dry contact for a light switch). |
| LGRA 505 | Charging device with an antenna connection and an external message signalling (e.g. dry contact for a light switch). |
| LGL 505 | Charging device LGRA 505 with an additional LED for message signalling |
| SG 5050 | Peripherial unti enabling communication with a PC or a serial printer. |
| SGA 505 | Peripherial unit with an antenna connection. |